Friday, 28 June 2013

Summer Stock 2013

This is everything I currently have in stock! I am taking orders for late summer/fall when I will hopefully make it down to a game, so if there is something you want, now is the time to order! I can make anything you see here out of any leather I have in stock. (I always have black and browns. Other colours subject to availability. If there is a colour or type of leather you MUST have, I can special order, but it will probably cost extra. If you are not in a rush, let me know what you are looking for and I will keep my eyes peeled for deals.)

Hoods are available on request. Prices vary a lot for hoods, but generally start at $60. I also do custom work. If there is something specific you are looking for please contact me at shigil@gmail.com

Water Bottle Sleeves: $20. Also available without the belt strap for $10 (in black, white, burgundy and taupe).

Large Water Bottle Sleeve: $25. Fits Gatorade size bottles. Also available without the belt strap for $20.

Belt Pouches: $20 reg, $25 for large (the black pouch on the left is a large).

Belt Bags: $30

Pokes: $10 small, $15 large (Gold dot is a gold coin from UW for size)

Green Suede Shoulder Bag: $40


Wednesday, 7 November 2012

Shearling Scrap Mantle

After dumping out my bag of sheep shearling scraps on the floor and rolling around in glee, I decided to make something out of them. I have a concept for a LARP character who's a northerner, but I want her costume to look somewhat ragged and patchwork. I stitched a bunch of the scraps together in the rough shape off the cloak caplet I work with for hoods. My hope is to use this mantle to top of a cloak when I finally get around to making one. (Even if I don't get around to it, the mantle is nice and warm!)

Shearling mantle front.

I'm going for a ragged edge, but it's hard with the fluffy shearling.

You can see the different colours of the scraps along the back.

Tuesday, 11 September 2012

Introducing the Poke!

The poke is a traditional little leather pouch I am adding to my arsenal. I wanted to make something small and affordable for everyone and these are great for carrying around small items like coins. The small pokes are about 5 inches deep and the larger ones are about 7 inches deep (they all vary slightly in size because they are handmade, but just to give you an idea of size).

Pokes! Draw string closure made from matching leather.

Monday, 10 September 2012

Goat Hide Shoulder Bag

The bag is made from plain black leather, but I added a hair-on goat hide for the flap to make it unique looking. I also added a celtic design concho as a button clasp. I've never had a problem with plain flaps, but a number of people have asked about closures. I think this works well with the goat hair flap. (To see a better image of the concho design go here.)

Goat hair-on hide flap and black leather shoulder bag.

Large pocket (no gusset) and a long, wide strap for comfort. Button closure.

Lilah's Water Bottle Sleeve

Because what's the point of all this lovely work if I can't make something nice for myself? I made this sleeve from the same leather as Lilah's utility belt to match her costume. The monogram was extra work, but totally worth it!

Monogramed sleeve for 591ml bottles.

Monday, 3 September 2012

Water Bottle Sleeves

Dear LARPers, are you tired of unsightly water bottles wrecking your immersion? Well now there's a solution! Introducing my very own water bottle sleeve design. I've been struggling with prototypes for months, but I finally have something that is easy to use and will blend into any costume. No more fooling around with water skins or carrying unsightly plastic bottles, just grab your water, slip it into the sleeve, attach it to your belt and run off to adventure!

Period looking leather covers most of the bottle. Out of sight, out of mind.

Line-24 snap for easy attachment/removal from belt. Draw string for easy closure.

Snap it on and go!
This is the water bottle size, but I'm going to make a roomier one for larger Gatorade type bottles/cans. I'm also looking at making a version that is just the sleeve for around the campsite or for tossing into larger bags incase the belt clip is not needed.

Sunday, 26 August 2012

Art Experiment: ink and gouache wash-off

Hello craft fans! This blog post follows me as I try my first ink and gouache wash-off. I wanted to show the process and not just the finished product. This is the first time I've ever done this, but the results were really neat and I want to share!


Step 1: I started by transferring my drawing onto watercolour paper. I used Arches cold press for it's texture and because this paper can really take a beating (which is important as we'll see later). After penciling in the lines where I want the ink to go, I washed in some watercolours in red and yellow. This is so you can see where you are painting your white gouache onto the paper (instead of white on white), but I was also hoping for some staining which is why I used different colours.


Step 2: After the watercolour is completely dry it's time for the gouache! Anywhere you want white on the paper you paint with the gouache. Wherever the gouache doesn't cover, ink will absorb into the paper. (Yes I almost forgot the photo for this stage so you can see some ink wash on the top.)


Step 3: Using an indelible ink, lightly brush a coat over the entire surface. The ink will soak into the paper wherever there are openings. The idea is that because the gouache is water soluble but the ink is not, when you expose the paper to water, the gouache will break up and come off taking the ink on top with it, while the ink that has bonded with the paper stays.


Step 4: Wash it all off! I took my paper and ran it under a tap while wiping the paper with a cloth to remove excess gouache. Some areas took a little scrubbing, but otherwise, the gouache melted off the paper taking the layer of ink with it. I taped the paper down and let it dry completely before doing anything else to it. I was happy to see that the watercolour did some staining! Another effect of the wash is that there are different tones of grey where the gouache was not laid down very thick and the ink stains the paper.


Step 5: After the paper is dry I did a couple touch ups with ink and added the alchemical symbols in the ring. Then I used watercolours on top to add more depth and colour to the piece. Viola!

Sacred and Profane by Sabine Gorecki 2012.

When I first read about gouache and ink wash-off, my mind went immediately to old woodblock prints of werewolves. I envisioned a werewolf in a pose something akin to DaVinci's Vitruvian Man, but I also wanted to work with a female form. Thus Sacred and Profane was born.

Friday, 6 April 2012

2012 Belt Bags

I've had great feedback for the belt bags, so I've made some more for 2012! The red and black are made from heavy suede splits, while the brown pouch is a soft deerskin. I was feeling a little adventurous so I tried making one of these in a hair-on goat hide (backed with black suede). What do you think?

Brown, burgundy and black pouches.

Hair-on goat skin bag.

Large Belt Pouches

These belt pouches are about an inch deeper than the standard ones I make. They also come with a designer snap set on the front.

Large belt pouch 2012: New and improved!
Pouches can be made in black, dark brown or medium brown leather.

Monday, 10 October 2011

Crochet caplet

I was given this moss-like yarn for free so I decided to make a costume piece with it for the cooler fall weather. It was hard to work with, but you can't really see the mistakes either due to it's fuzzy nature. I had just enough yarn to make what you see here, otherwise I wouldn't have minded making a larger shawl. I like the end result and it's nice and warm to wear! The pattern is from Debbie Stoller's Happy Hooker book. These are easy to make in case anyone is interested!

I meant to put a clasp on the front, but right now it's just an impossible knot!

Draped over the back.

Thursday, 29 September 2011

Huntsman's Hood

I've been wanting to try and make a leather hood/cowl for some time now. This was an experiment based on a cloak pattern for cloth. I made some adjustments and away we went! I was surprised at how big the hood turned out. As much as I would like the hood to "drape" it could still be done with a bit less leather. Still, I think it's very period looking and does the job. Made out of really cheap suede splits (you can see some of the holes in the pics. Personally I think they add character).

The clasp is a line 24 snap.

The back. It is really hard to take pictures of yourself.

With the hood down. I liked this shot, so I included it.

Lilah's Utility Belt

Eat your heart out Batman! This is a tool belt for one of my LARP characters who -- as you can see -- has a lot of stuff she has to carry around with her, including weapons. I decided to go for a forest motif in green leather (it's hard to see, but the belt is made up of three Ivy leaf shaped sections). Functionality also played a huge part in the creation of this piece. I needed something that would not only carry all of my things, but allow me to bend, crouch, sit, and run with ease. Pieces had to remain flexible and some of them I even made removable (like the sword sheath). I look forward to testing it in the field this weekend!

You can see the ivy leaf motif best from the front.

Dagger holster, pipe and tobacco pouch and rope ring.

I love the way the sword sheath turned out! The gap in the back is also due to the fact that this character has a tail I have to accommodate.

Friday, 20 May 2011

Salamander Art

I did this a while ago (March I think?) but I didn't have a viable scanner. I found this while cleaning today and I'm glad I did, because now I can share it! This piece is done with inks, watercolour and gauche on watercolour paper.

He who triumphs over the flames of passion by Sabine Gorecki, 2011.

There is a lot of personal symbolism in this piece, as with much of my "line work" art. The Salamander is seen as the elemental of fire, often associated with purity. The crown is another symbol often seen with Salamanders. In this case I feel it shows his sense of mastery over the flames. This piece shows different cycles, and I made the salamander in an "ouroboros" position as a symbol of self-renewal. We all have the ability to continually remake ourselves as well as mastering ourselves, achieving balance with our needs and passions.

Monday, 16 May 2011

Real buckskin shoulder bag

I found some real deerskin at a reasonable price, so I made a similar bag to my black suede "buckskinner" bag, with a few adjustments. The strap is cow suede (because it's next to impossible to find a piece of deer hide long enough to make a strap like that) but it adds to the durability of the bag. And it matches! I had a hard time with finding something in my stash that matched.

Medium sized buckskin bag.

I left the natural fringe on the flap for that "rugged" look.

Thursday, 28 April 2011

Belt Bags

These period style bags are larger than the belt pouches I make, but still have the benefit of hanging from a belt. Based on the Butterick pattern B5371, I cut them out of suede splits and stitched them together by hand.

Period belt bags made from suede splits.

Wednesday, 27 April 2011

Meduim "Buckskinner" shoulder bag

I'm working on some larger pieces. Here's the first finished one. A very simple, "buckskinner" style over-the-shoulder bag done in a durable black suede. All hand stitched with a wide strap.

Black over-the-shoulder bag.

Simple, single pocket with wide strap.

Medium sized bag on a medium sized person for scale. :D

2011 Belt Pouches

Four new belt pouches ready for the new LARP season! Each pouch is set with a line 24 snap on the front and the back strap for easy removal (live and learn). Leathers range from stiff stone oiled cow hide to hair-on-hide.

Everyone's favourite belt pouch is back!

Saturday, 2 April 2011

Peacock Mask

I made this for the masquerade, but couldn't go to the ball. *sniff* Oh well, there's always next year! Carved out of thick (9-10oz) leather and painted with metallic acrylics.

Leather peacock mask by Sabine Gorecki.

Friday, 1 April 2011

Clutch purse

I made this for a gift exchange, and I'm pleased to see my hand stitching improve so much. I think I finally got the knack!

Gray clutch purse with hair-on-hide flap.

Oh, look at that stitching!

Spirit Pouch

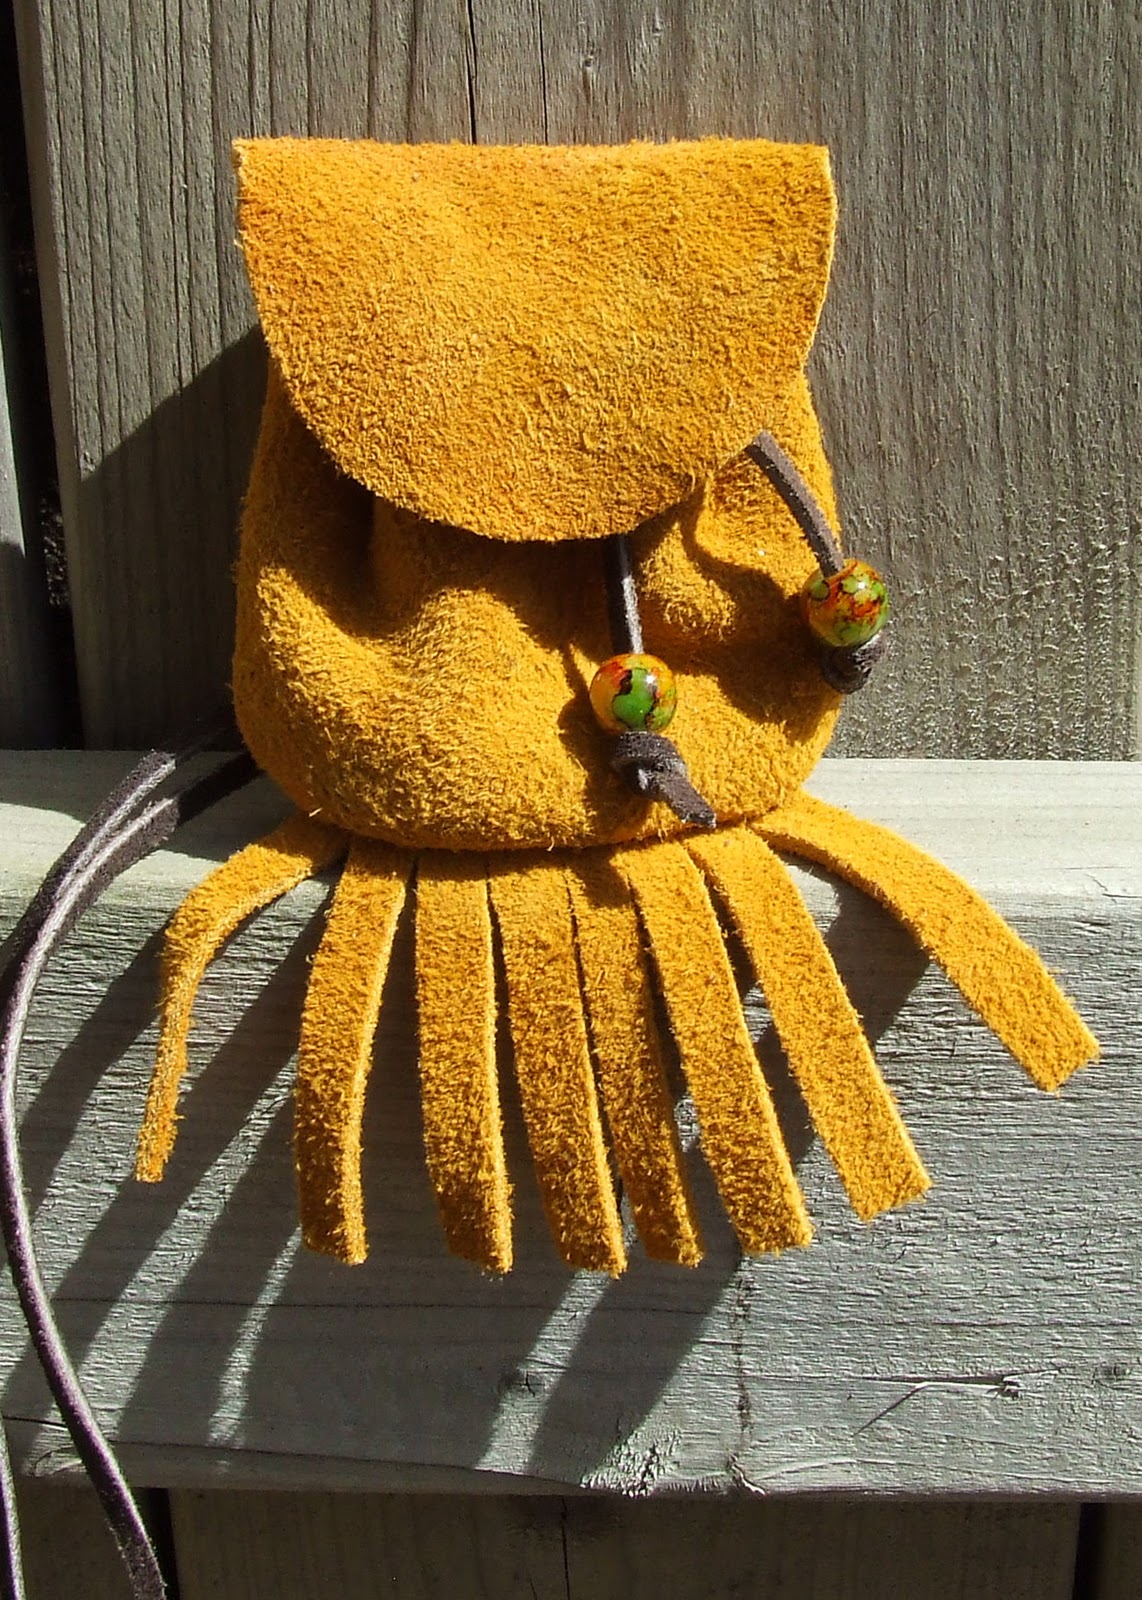
I made this tiny pouch based on the Butterick pattern B5371 out of scraps. I added the fringe on the bottom and turned it into a necklace instead of a belt bag.You can see the full sized versions here.


Little "spirit pouch" necklace.